Choosing a bike, stripping the weight, and working out what comes next
Turning a farm bike into a farm race bike starts with finding a suitable bike, getting rid of the farm equipment, and making sure what’s left is ready for a decent hiding.
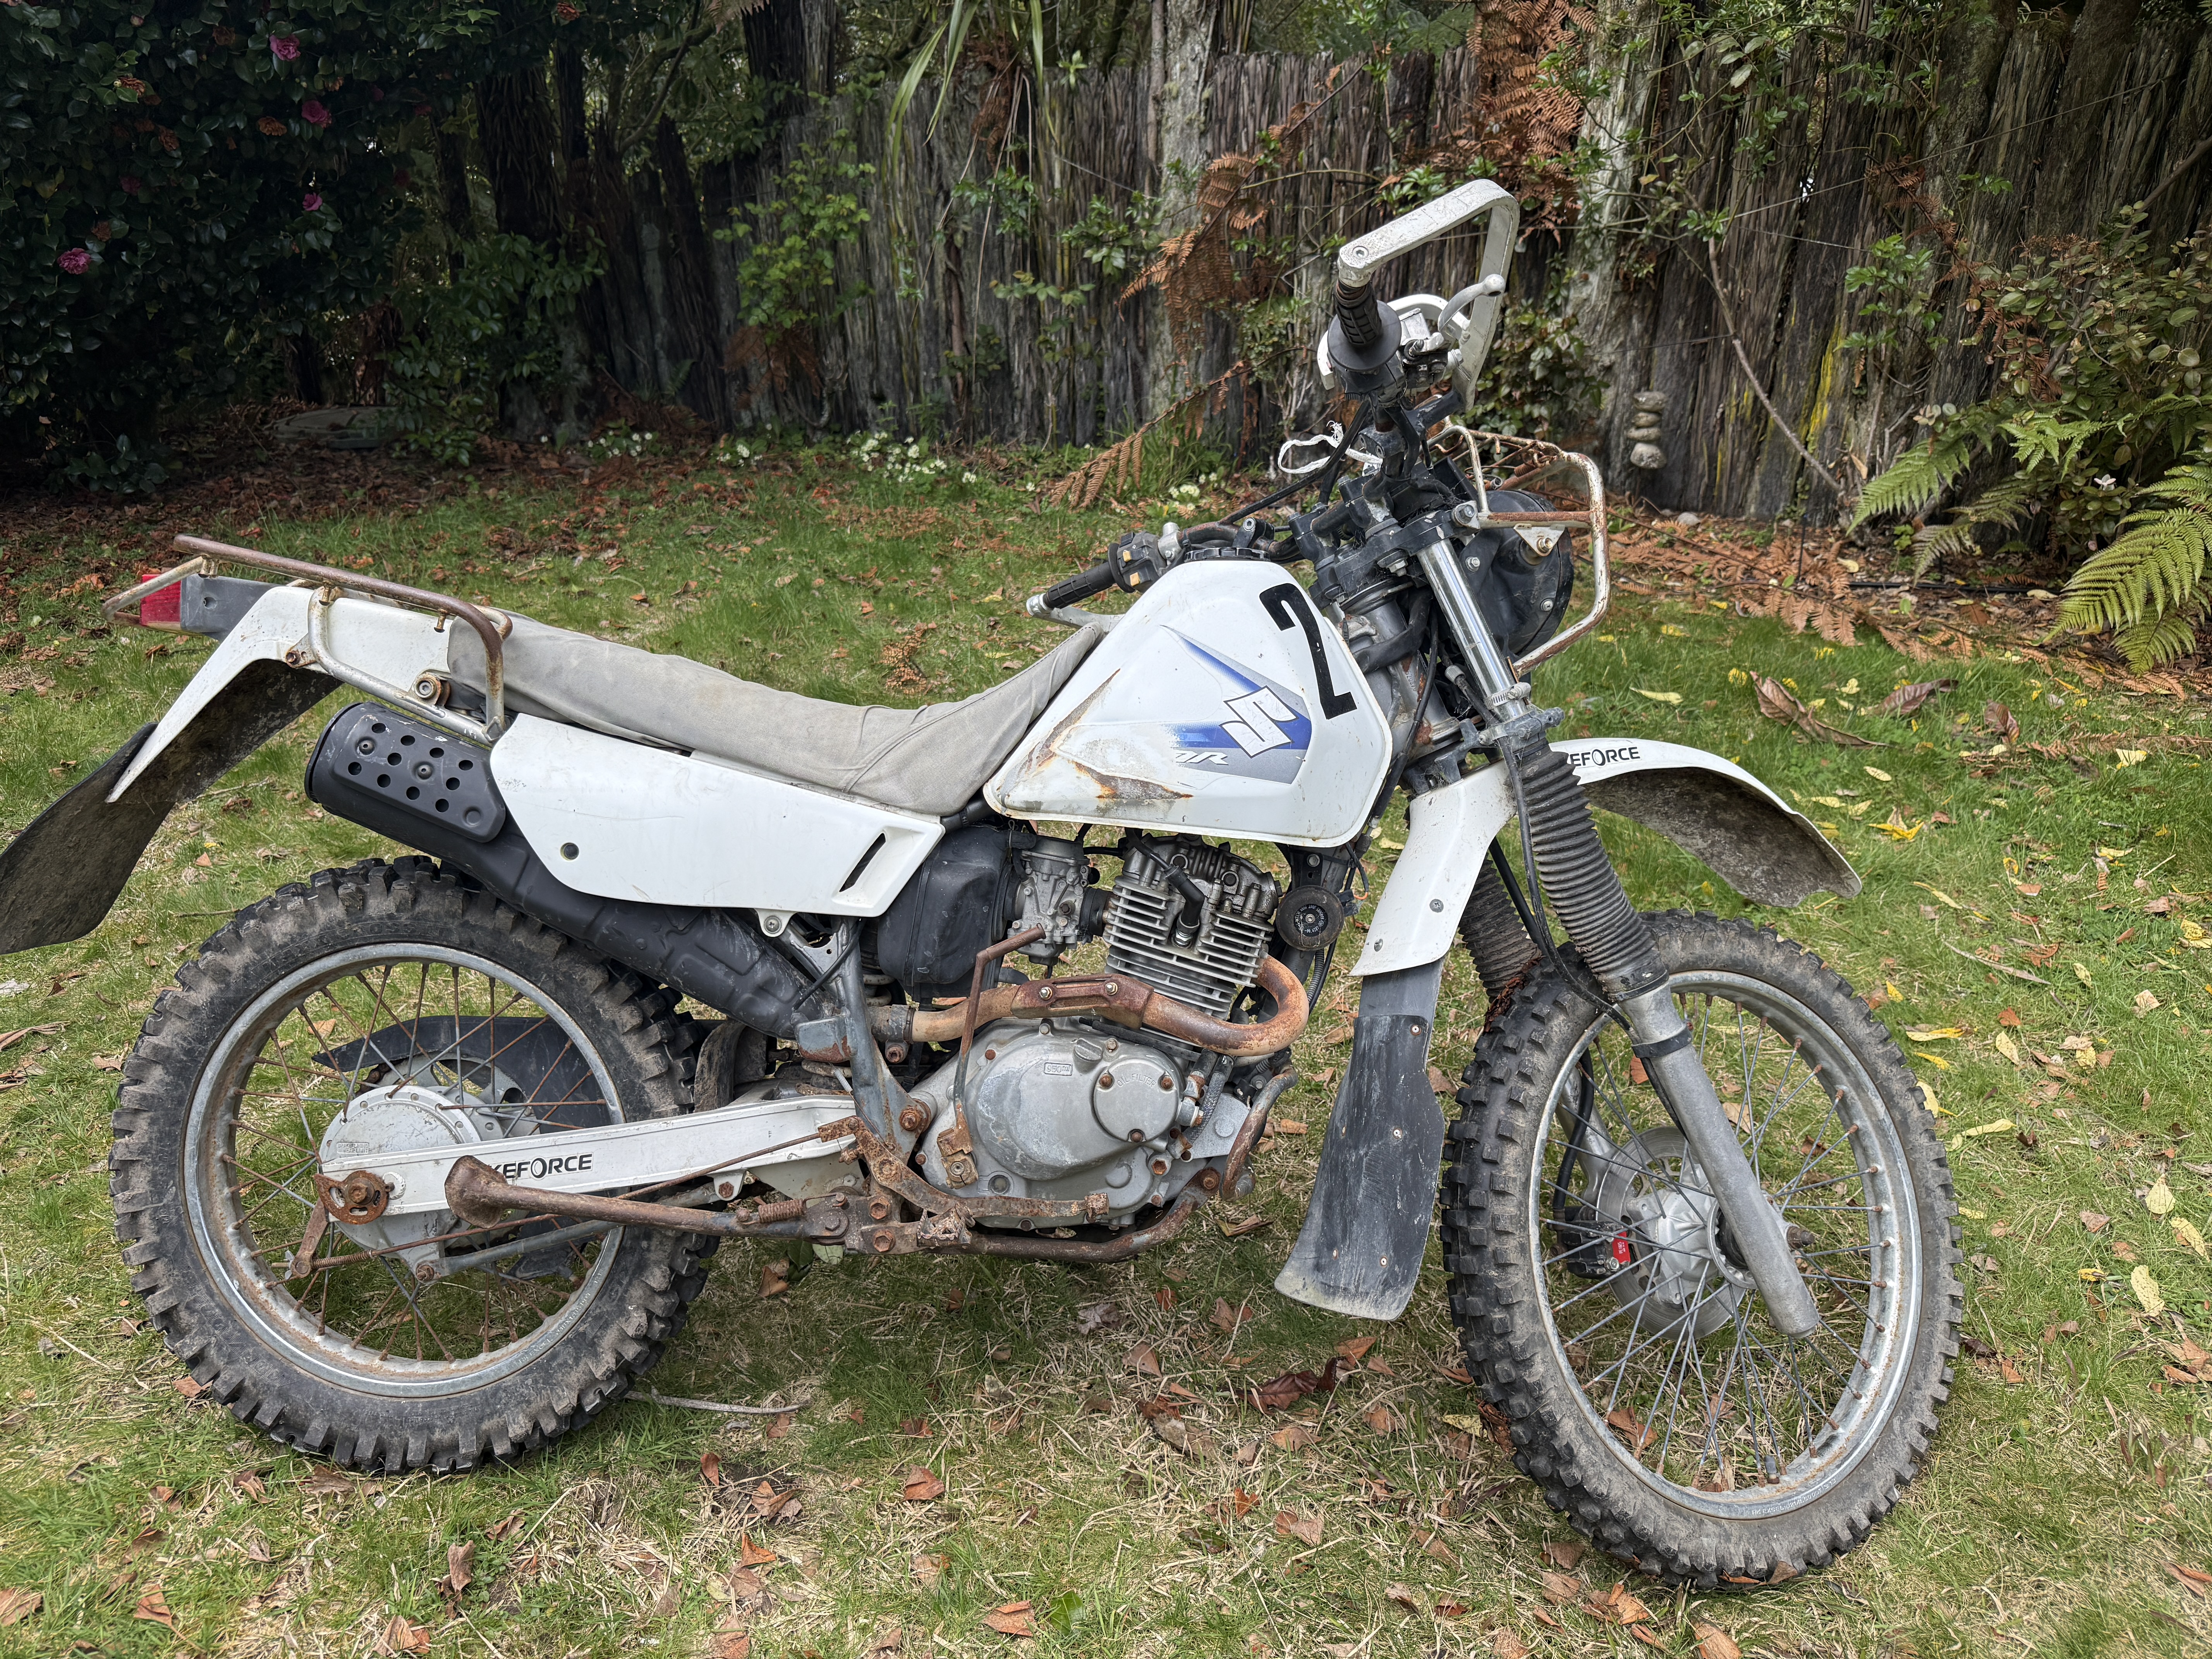
I’m doing this with a Suzuki DR200. Here’s what’s involved, what I’ve done so far, and what’s still on the list.
Choosing a base bike
Let’s be honest: the best bike is the one you’ve got and beggars can’t be choosers. Most likely the bike is coming to the end of its farm life and you are either acquiring it or buying it cheap (like me). But if you’re going to race it for four or 24 hours, it also needs to be reliable. You’re looking for a cheap bike with a good engine.
That probably means accepting something cosmetically rough as guts. The bottom of these bikes spends its working life outside covered in wet cow shit, and that stuff is fierce. Expect corrosion, seized fasteners, and some jobs that take longer than they should.
The trick is to look past ugly plastics and tired paint while paying attention to the condition of the parts you’ll actually be racing. A cheap purchase can become expensive quickly if the engine, frame, or suspension needs major work.
Rough racks and bent bars are less of a concern. You’ll be removing plenty of the farm equipment anyway, and you’ll probably want stronger handlebars. OEM Ag bike bars tend to be weak and really bendy.
Before buying, check the rules for the event you want to enter. Make sure the bike—and the changes you’re planning—will fit.
Starting baseline
Before pulling anything off, I weighed my bike to see where I was starting.
My DR200 weighed 129kg with a full tank.
Remove the farm equipment
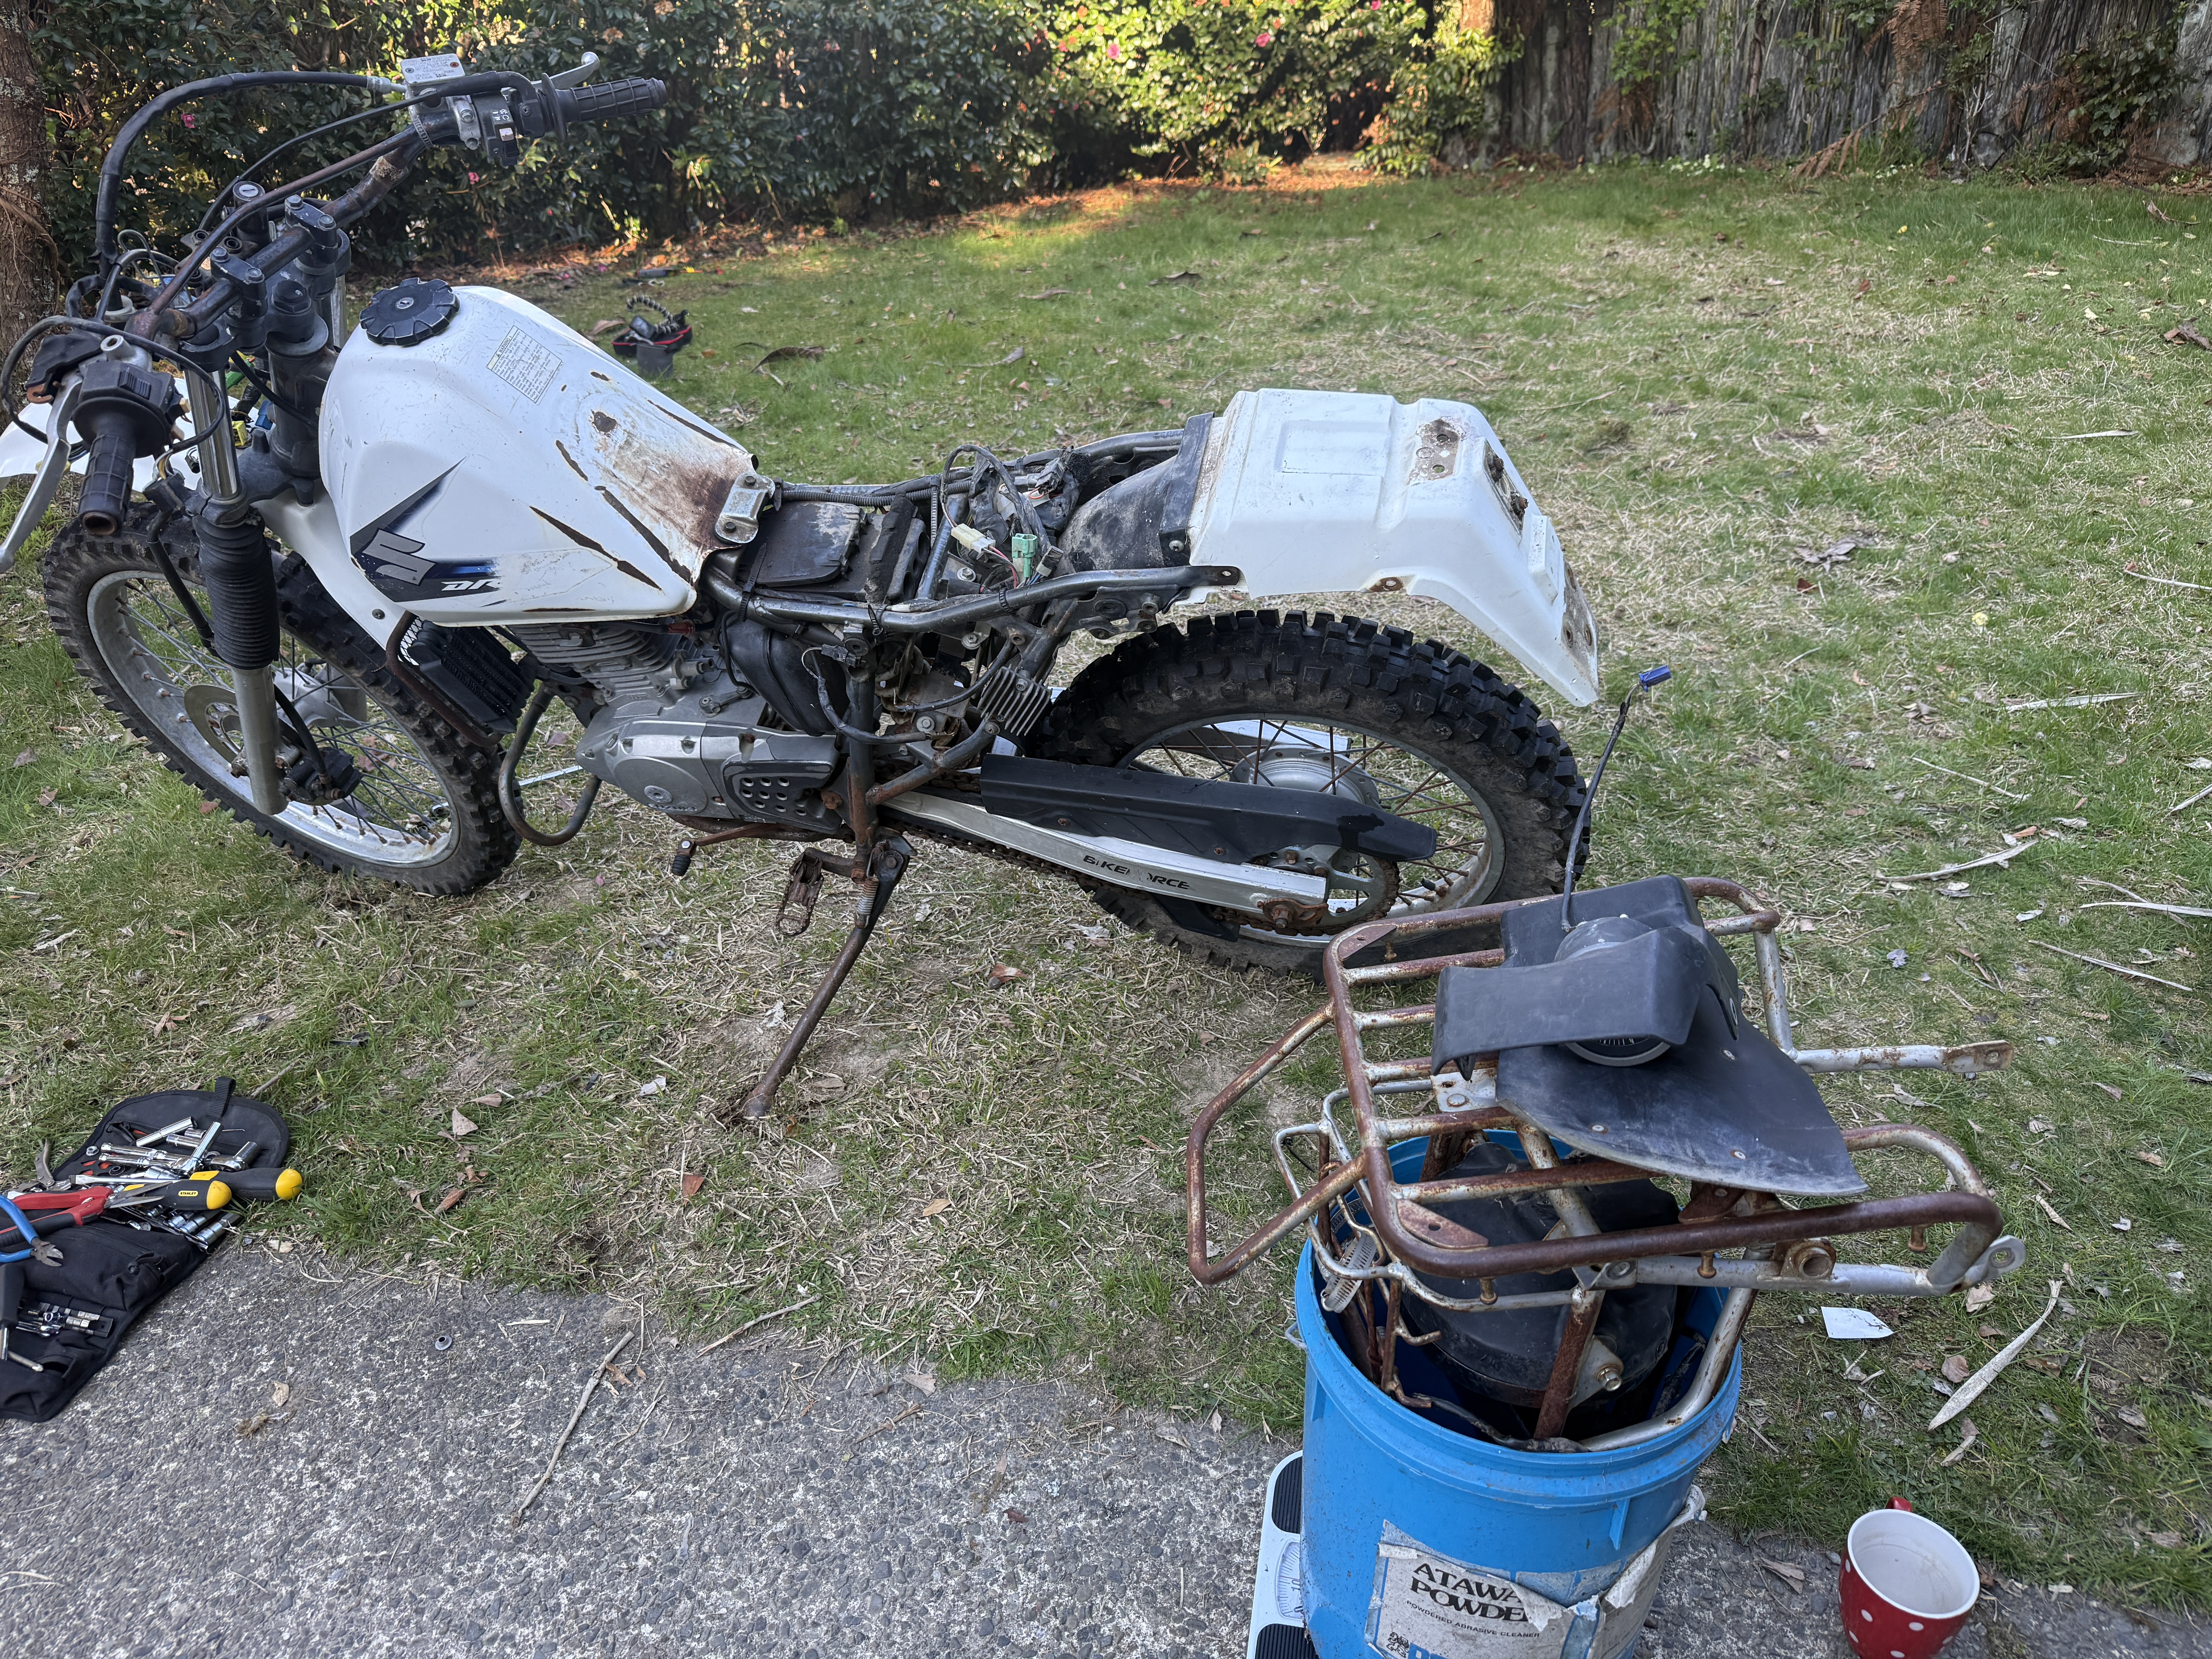
The first stage is straightforward: work out what needs removing to meet race rules (typically race rules require removing racks) and what the bike no longer needs for its new job.
Front rack and headlight
Rear rack and rear light
Front and rear mudflaps
Right-hand side stand
Chainguard
Odometer & dash lights
Thats about 9kg right there
I also de-keyed the fuel cap and chopped the rear fender.
To de-key the DR’s fuel cap take off the fuel cap and turn it upside down, remove the 2 x Phillips head screws and remove the retaining plate. Remove the internal locking bars/springs then reinstall the retaining plate and 2 screws. Done
Sort the bars and controls
Once the racks are off, the handlebars are the next area to tackle. Changing the bars will make the bike stronger and is an opportunity to save a bit more weight and simplify the electrics.
The stock bars are 22mm, I already have a set of OEM GASGAS ES700 bars on the shelf which need a 28mm mount so I’ve ordered a set of 22-28 handlebar adaptors/risers.
When changing bars, also check cable and hose routing through the full steering movement. The controls need to work freely without anything pulling tight or snagging.
Ride it.
Once the bars and controls are sorted, I’ll be able to ride-test the bike properly giving brakes, tyres, wheels, bearings, chain, and controls a proper check. Removing weight doesn’t fix worn-out running gear.
Tyres are important to sort at this point. Mine are a bit old but are hardly worn.
Get the suspension working properly
My next jobs are to assess the forks and rear shock, and service the suspension linkages.
I’ll start by getting the existing parts working as they can. Worn bearings, seized linkages, and neglected suspension need attention before you can judge the setup fairly.
At the front, I want to look at preload and investigate a heavier fork oil. Its easy enough to make preload spacers from PVC pipe and oil viscosity affects damping. Heavier oil isn’t automatically better, so that’s something to assess through testing. I’ll do a seperate post on this.
At the rear, I’ll check the shock’s condition and see what servicing is worthwhile. Adjustment will probably be limited to just winding the preload up.
Improve the contact points
Along with the bars the footpegs and seat are where you control the bike, so they deserve some attention.
I want to improve the footpegs and investigate moving them back a little. That means considering the position of the gear lever and rear brake pedal as well as the pegs themselves.
A grippier seat cover is also on the list. As the bike starts getting ridden harder, staying in position should take less effort.
Weigh up an exhaust change
The exhaust is a potential source of further weight savings so it’s on my list. An mx end can will be a lot lighter but fabbing a connection pipe will need work.
Check the event’s noise requirements and modification rules. Account for any fuelling changes the replacement might need.
Leave cosmetics until last
Once the bike works properly, then it’s time for new fenders, tank paint, and graphics.
On mine, that means replacement front and rear fenders, painting the tank, and adding some graphics to finish it off.
For now, the first stage is complete: 9kg removed, replacement controls and fitting parts ordered, and a clear list of jobs before the first proper test. The next decisions will come from riding it.
The Suzuki DR200SE Trojan is a 199 cc, four-stroke agricultural motorcycle developed for farm work. Closely associated with New Zealand and Australia, it combines a small trail-bike platform with equipment intended for carrying tools, moving livestock and working on uneven ground.
The Trojan has a significant New Zealand development story. Suzuki NZ credits Tom Peck with turning a Japanese domestic trail bike into a farm motorcycle, beginning development in 1994 and recording sales from 1996. Suzuki NZ: Tom Peck and the Trojan’s development
Understanding the bike requires some care with names. DR200SE does not always mean Trojan. Suzuki also used that designation for overseas dual-purpose motorcycles, and the related DR200S, Djebel 200 and DF200E have their own specifications and histories.
Research updated: 13 September 2026. Dates and specifications below apply to the identified market or source; they should not be assumed to cover every DR200.
Origins and New Zealand development
In 1994, Tom Peck began developing a replacement for Suzuki’s discontinued TF185 farm bike. Suzuki NZ’s account describes a process of testing and prototype component manufacture that adapted an existing Japanese trail motorcycle into the DR200SE Trojan.
By Peck’s retirement in 2024, Suzuki reported approximately 10,000 sales of the model since 1996. This provides a stronger basis for dating the New Zealand Trojan than the conflicting dates found in some online model summaries. Suzuki NZ development history
A separate agricultural report describes the locally developed prototype being sent back to Japan before the production bike reached dealer showrooms in 1996. The process combined local farming experience with factory manufacture. Rural News: Trojans work hard every day
Model and version history
The wider family developed along several branches. Changes to a Japanese Djebel or an overseas DR200S should not automatically be treated as changes to the Trojan.
Year or period
Documented milestone
1985
Suzuki’s Japanese archive records the SX200R, an earlier 199 cc trail model in the history leading to the Djebel and DF200E.
1993
Suzuki introduces the Japanese Djebel 200, equipped for trail riding and touring.
1994
Tom Peck begins the New Zealand farm-bike development project.
1996
Suzuki NZ dates Trojan sales from this year.
1997
Suzuki’s Japanese archive records the utility-equipped DF200E.
2003
Suzuki announces a plated-cylinder update for the Japanese Djebel 200. This is a documented Djebel change, not a confirmed Trojan change date.
2015
Suzuki identifies an update to the DR200S, the dual-purpose branch of the family.
2021
A September 2021 Suzuki NZ brochure documents the Trojan’s equipment and specifications.
2026
Farmers Weekly reports that DR200SE farm-bike production is ending and remaining New Zealand stock is being sold.
A complete year-by-year Trojan change log remains difficult to establish from the available records. Cosmetic changes, changes in published measurements and actual mechanical revisions need to be distinguished.
Related models and markets
New Zealand and Australia: DR200SE Trojan
The Trojan is the agricultural version familiar to many Australasian owners. Australian Suzuki literature documents farm equipment including twin side stands, headlight protection, an engine guard and extended mudflaps. Australian Suzuki Trojan brochure
The New Zealand introduction is documented above. The exact first Australian sale date is less securely established by the sources used here.
North America: DR200SE and DR200S
North American parts records distinguish US, Canadian and Californian DR200SE versions. This matters when looking up components, particularly equipment that varies by market. Suzuki parts catalogue reproduced by a parts supplier
Suzuki’s US accessory catalogue lists DR200SE applications for 2006–2013 and DR200S applications for 2015–2020. These are the fitment years stated for that accessory, not proof of the complete worldwide production period. Suzuki USA fitment listing
Suzuki’s global DR200S page explicitly dates its update to 2015. The DR200S retained a 199 cc air-cooled single-cylinder engine and five-speed transmission. Suzuki global DR200S information
Japan: Djebel 200 and DF200E
Suzuki’s archive identifies the 1993 Djebel 200 as a touring-oriented trail motorcycle with a 13-litre tank and large headlight.
The 1997 DF200E adds utility equipment including an oil cooler, engine protection, substantial mudflaps, chain enclosure and rear carrier. It is a useful comparison with the Trojan, but its Japanese-market identity and published dimensions should be preserved. Suzuki archive: Djebel 200 and DF200E
In July 2003, Suzuki announced a Djebel 200 update using a plated cylinder to improve heat dissipation and durability. The announcement also documents both electric and kick starting. Suzuki’s 2003 announcement, in Japanese
African export markets
The DR200SE was also marketed in Africa. A Ghana distributor brochure and Suzuki Namibia’s model page provide examples.
Namibia’s published specification includes a 199 cc engine, five-speed gearbox, 13-litre tank and 132 kg curb mass. These records demonstrate that a history confined to North America, Japan and Australasia would be incomplete. They do not establish identical equipment or sale dates across African markets. Ghana DR200SE brochure, Suzuki Namibia DR200SE
What makes the Trojan a farm bike?
Suzuki NZ’s September 2021 brochure lists:
Electric starting with a kick-start backup.
Side stands on both sides.
Front and rear carriers.
A large 60/55 W headlight.
Handlebar protectors and sump protection.
Extended mudflaps.
An oil cooler.
A clutch lock.
A sealed drive chain.
Together, these features support repeated stops, carrying equipment and low-speed work around a farm. Suzuki NZ Trojan brochure
The Australian brochure similarly specifies protective equipment and 21-inch front and 18-inch rear wheels. Its chassis uses telescopic front forks and link-type rear suspension, with a front disc brake and rear drum brake. Australian Suzuki brochure
Engine and specifications
The following engine details come from Suzuki NZ’s September 2021 brochure.
These figures do not establish when—or whether—a particular physical change occurred. Different equipment, measurement conventions or errors in published material may account for discrepancies. Dry and wet weights also cannot be compared as equivalent measurements.
Power figures
Suzuki’s Japanese archive quotes 14.7 kW / 20 PS at 8,500 rpm for the recorded Djebel 200 and DF200E. That is evidence for those versions, not a verified power rating for every Trojan. PS is metric horsepower and should not be silently relabelled as an identical figure in mechanical horsepower. Suzuki historical specifications
Identifying a bike and finding compatible parts
For an owner, the most useful identification is the combination of model, model year, market and frame number.
Before ordering parts, record:
The frame/VIN marking and identification plate.
The engine number.
The full model designation in the bike’s documents.
Its original market, if known.
Any modifications to the fuel system, electrical equipment or bodywork.
Suzuki’s DR200SE service manual includes serial-number locations, market information and model supplements. Check those sections before applying a specification or procedure. Suzuki DR200SE service manual, hosted by ManualsLib
Parts catalogues show why the additional detail matters. A 2005 catalogue separates E03, E28 and E33 applications from E06 and E24 applications. The corresponding market listings identify the US, Canada, California, South Africa and Australia. 2005 DR200SE catalogue selector
A later Australian listing identifies DR200SEM4E24 as a 2024 model and includes separate oil-cooler and kick-starter diagrams. 2024 Australian parts catalogue
Matching original part numbers, including any documented replacement numbers, is a better basis for compatibility than a seller’s broad “fits DR200” description.
Farm use and owner experience
A 2019 report on an Opiki farming family describes four Trojans used for moving dairy cows and young stock. The owners particularly valued reliability, handling and the headlight for early starts and late finishes.
This is a useful account of the bike’s working role, although one farm’s experience is not a reliability study of the whole model. Rural News: Trojans work hard every day
For maintenance, use the correct manual’s schedule and procedures. The DR200SE workshop manual covers air-cleaner servicing, valve clearance, fuel and lubrication systems, brakes, suspension and electrical diagnosis. A used bike’s condition and service history deserve attention alongside its model year. Suzuki DR200SE workshop manual
Production status
On 12 February 2026, Farmers Weekly reported that DR200SE farm-bike production was ending. The report quoted a Balclutha dealer representative describing limited remaining New Zealand stock and a final shipment.
This is a dated report of the model’s withdrawal, rather than a verified factory production-end date covering every country and DR200 derivative. The suggested replacement in that article was also described as a likelihood, not a confirmed specification. Farmers Weekly production report
Mixed versions; verify technical claims against manuals
For a dedicated Trojan owner’s manual, give a Suzuki dealer the bike’s frame number and request the matching publication and any relevant supplements.
Gaps in the historical record
Further documentation would help establish:
The first Australian Trojan sale date and early model designations.
A year-by-year record of Trojan mechanical changes.
Whether differing seat-height figures reflect physical changes or publication differences.
The timing of any Trojan cylinder, ignition or gearing revisions.
Exact production-end dates and final model years by market.
Documented Trojan use in farm-bike racing.
Period brochures, dated photographs, original manuals and Suzuki parts bulletins would be particularly useful. Contributions are most valuable when they include the year, country and source, so that details from different versions can be kept separate.
The information in this post was collated by ChatGPT – 6 Astral
The Vibe: A proper low-key community farm-bike relay. Teams of at least three riders, with a 125cc limit and two-wheelers only. Cheap entry, free camping, hāngī and live music afterwards — very much the grassroots end of NZ farm-bike racing.
Cost: $20 per rider. Free camping; showers and toilets available. Hāngī $15 koha.
Bike Rules: Two-wheel farm bikes only, maximum 125cc. Minimum three riders per relay team.
Taupiri / Waimate 24-Hour Farm Bike Challenge (2026 Sold Out in about a minute of entries opening)
When: Mid-November (Annually)
Where: 772 Gum Tree Flat Road, Ikawai / Waihaorunga, South Canterbury
The Vibe: Teams of riders push a single factory-stock agricultural workhorse through non-stop 24-hour cycles of deep ruts, mud, and intense night riding.
ECOMAX RMC Taupiri 24-Hour Farm Bike Enduro (cant find dates for 2026 event)
When: Late February (Annually)
Where: North Waikato Motocross Track and surrounding properties, Taupiri
The Vibe: Teams of four riders take turns keeping a single, factory-stock agricultural bike running continuously for 24 hours straight through grueling day-and-night cycles to raise funds for the Waikato Rural Support Trust.
Where: Fairfield Road, Ongaonga, Central Hawke’s Bay
The Vibe: A 4-hour endurance and sprint fundraiser for the Ongaonga Fire Brigade, strictly capped at traditional farm bikes under 230cc with options for solo riders or teams of up to four.
The Vibe: A 4-hour team endurance race where pairs of riders swap every 20 minutes through a pit lane and navigate a mandatory joker lane across a mixed cross-country, enduro, and motocross track.
The Vibe: A 2-hour winter paddock-bashing track prone to deep mud bogs, featuring an on-site community BBQ fundraiser and prizes for the best rider fancy dress costume.
I’ve seen a few questions floating around lately about ditching gas and going fully electric in campervans. Induction cooking usually comes up pretty quickly in that conversation.
It sounds great in theory. No gas bottles, no refills, no open flame and often the major consideration no compliance! Just a clean electric setup.
But the question I kept coming back to was pretty simple:
how much solar do you actually need to make that work?
Not in ideal conditions. Not parked in the sun in the middle of summer.
More like… middle of winter, van parked up, doing normal daily life.
Starting point
Solar is one of those things where location matters a lot. You see people online talking about setups that work for them, but they might be in completely different conditions.
So I based this on home — New Zealand — and more specifically a winter scenario where you’re only getting about:
~2 hours of usable solar per day
That’s not worst-case survival mode, but it’s realistic enough if you’re actually using the van year-round.
What I wanted to figure out
I wasn’t trying to design a full system.
Just answer one question:
If I use induction for cooking, how much solar do I need to replace just that energy each day?
The numbers I ended up with
Induction Cooking
Daily Energy (Wh)
Solar Needed (W)
Light (20 mins)
600
400
Moderate (30 mins)
1000
650
High (1 hour)
2000
1300
How I got there
Nothing fancy here. Just breaking it down.
First step was estimating how much energy the induction hob uses.
I based it on a 2000W unit, which is about the upper end of what you’d realistically run off a 12V system with a 2000W inverter.
Then I guessed usage:
Light use boiling water, quick meals ~20 minutes per day at full power
Moderate use boiling + simple cooking (pasta, etc) ~30 minutes per day
High use proper cooking, multiple meals up to 1 hour per day
From that, you get daily energy use:
2000W × time = Wh per day
That part’s straightforward.
The part people often miss
The solar side of it is where things get a bit more interesting.
Instead of just guessing panel size, I used solar irradiance (solar hours).
That tool is set up to estimate full system output, but in this case I just wanted the solar hours figure that’s also there so I could work backwards.
Once you’ve got:
daily energy use (Wh)
solar hours (kWh/m²/day or “sun hours”)
You can estimate panel size pretty easily.
I chucked it into a spreadsheet and worked out how many watts of solar you’d need to replace what you used that day.
Reality check
This is where it starts to get interesting.
That 1300W of solar for heavier use?
That’s a lot on a van roof.
Even 400–650W is starting to push into “this needs to be thought through properly” territory, especially once you factor in other loads (fridge, lights, charging gear)
And that’s before you even get into battery size.
What this doesn’t show (but matters)
A couple of things this simple calculation doesn’t capture:
Inverter losses (you’ll lose ~10–15%)
Battery charge/discharge inefficiency
Behaviour changes (you might cook differently once you see the power impact)
But even allowing for those, the overall picture doesn’t change much.
The takeaway (at least how I see it)
You can run induction cooking off solar.
But in winter, in NZ conditions:
it’s not a small system
it’s not a cheap system
and it’s definitely not “set and forget”
What usually ends up happening is people land somewhere in the middle:
induction for occasional use
gas as a backup
or adjusting cooking habits
Here are some other numbers:
Device
Voltage Type (12V/AC)
Peak Watts
Duty Cycle (%)
Hours Used per Day
Daily Energy (Wh)
Solar Irradiance (kWh/m²/day)
System Efficiency (%)
Solar Watts Needed
12V Fridge (Small)
12V
45
40
24
432
2
75
288
12V Fridge (Large)
12V
70
50
24
840
2
75
560
Phone Charging
12V
10
100
2
20
2
75
13
Laptop
AC
45
100
2
90
2
75
60
Maxxair Fan (Low)
12V
10
100
8
80
2
75
53
Maxxair Fan (High)
12V
40
100
4
160
2
75
107
Induction cooking (light)
AC
2000
100
0.3
600
2
76
395
Induction cooking (moderate)
AC
2000
100
0.5
1000
2
77
649
Induction cooking (high)
AC
2000
100
1
2000
2
78
1282
Air Fryer
AC
1700
60
0.5
510
2
78
327
If you want to run your own numbers
Here is a DROPBOX LINK to the spreadsheet I used so you can plug in your own setup and see what happens.
That’s probably the most useful way to approach it — everyone’s usage is slightly different, and small changes add up quickly.
They say a picture tells a thousand words. Well this one doesn’t tell you anything about the past 2 days!! Behind the picture of a very pretty rainbow hides stories of the longest day I’ve ever had on a bike and multiple near death experiences in 100km that I thought was just going to be a nip down the hill.
It started benignly enough, an early(ish) start from Hawden Shelter campsite just below Authurs Pass. I was heading for Loch Katrine campsite via Lees Valley and lots of other tracks on Josh Martin’s (Adventure Guide) Smoking Dragon “Adventure”
By 1pm I was not far from heading up the hill via Lake Sumner Road and going to be at the campsite pretty early.
I’d had it in my radar to do Adventure Guides Banks Peninsular adventure. On let’s do it 👍
(Ed: hmmmm perhaps it’s all Josh’s fault 🤔)
What was a 380km planned day became a 707km day (lots and lots of gravel) with about 14 hrs riding time and a huge amount of ground covered.
707km and 14hrs saddle time
This wasn’t wandering and stopping to look at the view adv riding. From midday onwards it was missioning, it was all about getting the job done and if possible before the light failed.
The Banks Peninsular is stunning
I often ask myself “what is adventure?”, it’s something that I find intriguing. Suffice to say I think it’s complicated but in essence it’s about uncertain outcomes. That might be trying something that might not succeed or going places I haven’t been before. Yesterday ticked my adventure boxes and a learnt a lot from it. It’s good to know I can do I ride that involves 14 hrs of getting the job done 🤓
So it was a very tired Ian that arrived at Lake Taylor campsite in the last of the daylight, pitched his tent at and crawled into my sleeping bag last night
Sleep 😴
Not much. The wind picked up and up and up
Tired Ian didn’t get much sleep as the +100km/h wind roared like a jet engine through the big trees lining the lake/campsite boarder shaking my new tent to its limits.
Daylight arrived and the wind didn’t change. The wind was sooo wild it was ripping the water surface off the lake in clouds of spray
This image doesn’t convey the strength of the +100km/h gusts
Wind was forecast to continue but it was also forecast to start hosing down with 40mm of rain 🤔
Fortunately Taylor’s lake has a cooking shelter more akin to a hut than a shelter. I was looking at spending the day there riding out the storm. I figured I had a book plus plenty of food and coffee
But
Nightmare! My new Jetboil has shat itself. I couldn’t get it to fire up initially and then when I did it was an unregulated ball of death flame 🔥 😩
Faaark.
Place to hide from the weather – tick ✅
E-reader loaded with books – tick ✅
Hot drinks (tea or coffee I don’t care) – nope 👎
Food – nope 👎(I’ve only got dehydrated meals with me)
Faaark
At this point I had a really cool encounter with another resident of the wind blown campsite. A fellow Brit who had a working stove and a mokka coffee pot. Plenty of coffee and chat later and the weather looked like it was improving.
The wind was no longer ripping the surface off the lake but the rain radar was showing there was plenty to come. Was this the time to duck through the gap and head to civilisation 🤔
So I did, I ducked out and made a beeline for Hanmer Speings Top 10. A world of hot showers and a working kettle.
but
The ride down Lake Sumner Road was fine but I picked up a significant tail wind as I hit the plain. In the future I’ll know the problem this was going to cause
It turned out this tailwind was still gusting +100km/h on the Cantubury plains and once onto the main road it was a brutal side wind doing all that it could to push me into the oncoming traffic 😧
The next 60km were probably some of the most terrifying I’ve done. One moment I’d be coping ok, the next I was being pushed hard to the right by and irresistible force with tonnes of immediate death steel racing towards me.
I should have stopped in Culverden. The town was super busy with lots of other people stopped but rightly or wrongly I had my eye on the prize and so I pushed on
After Culverden the wind exposure ramped up. What I didn’t think could get worse did. It culminated just as I was about to exit the plains and head into the foothills. I think a constriction was accelerating already brutal winds to the point where it had blown out a caravans windows. There was glass everywhere and the police had stopped traffic.
Once stopped it was horrendous! I was really struggling to keep the bike upright. I pulled onto the side and even on the side stand it was impossible. I had a shouting conversation with the cop who was hiding behind his patrol car. He was asking if I was alright, I was saying NO!
I spend somewhere around 30mins there hanging onto the bike in what felt like a full jet blast of these ferociously hot winds. I haven’t mentioned yet how hot it was. I’d kept my waterproof on from the escape from Lake Taylor because it’s very HiVis and I needed any help I could get in preventing my impending death on the road. As a result my elbows were wet from the gathering sweat 😰 cause by the 100km/h hot winds
After 30 minutes of literally hanging hoping something would change I decided I needed to try changing something and at the very least finding somewhere with some shelter.
Getting going was hard and scary but as I got going again it felt safer. Once I got to the turn off to Hamner the road got some shelter.
The relief of arriving at the campsite was significant. I was finally safe and could stop.
There was both a physical and mental toll from riding in the wind. I was so tired from both. Power is off in Hanmer so a shower hasn’t been possible yet. The wind is so drying I could feel a crusty ring of dried snot around my nostrils. I’m really looking forward to the luxury of a shower
Only one pub in Hanmer has a back up generator but I found a table and have availed myself of its facilities 🍺
So what’s adventure?
Would it have been adventure to not do dumb shit like adding a 240km extra loop to and already 380km planned ride 🤔
Would it have been more sensible to stay out at Lake Taylor and suck up the lack of coffee and ride out the storm 🤔 rather than putting myself through all those near death experiences. Where does hindsight sit in this?
I’ve definitely learnt some shit about myself and riding decisions I might make in the future. In simple terms:
I can do 14hr of riding days if needed. They are tough but I can do them
100km/h winds are fucking dangerous for motorcyclists. I know “no shit Sherlock!!” But sometimes you just gotta learn the hard way
Beer tastes sooooo guuuuuuud when it’s been really earned 🫡
So the other day I almost set fire to my kitchen using my MSR XGK inside 🫏
🫏 = donkey 🙄
I’m sharing the story because there is always stuff to learn from other peoples experiences no matter how dumb they might be 😞
Here’s how it happened:
I’ve got a new pot and wanted to experiment to see how well my simmering technique works on this smaller circumference pot. I decided inside on my kitchens glass cook top was the ideal place to do this 🫏 🙄
My simmering technique works by getting the stove going and up to temp. I then close the valve and wait for the flame to go to yellow. I then s l o w l y open the valve. This way I can see the power from the fuel kick in and identify the exact point the valve is letting through fuel. From this point it’s pretty easy to use micro adjustments and patience to pretty accurately control the flame.
Anyway
I was messing with this seeing how precisely I could control the temperature of the flame when fuel started to leak out of the brass fitting the valve adjustment screw goes through. OH SHIT!!
I immediately turn off the fuel and it stopped leaking but about 5ml of fluid had leaked out and despite the stove being in simmer mode it was running hot with a blue flame and glowing bell 😱
Well the obvious happened and the vapour caught. The valve already was alight.
I have a powder extinguisher in the kitchen and I grabbed it. The current small flame wasn’t a problem but any failure at the valve and the smallest MSR bottle still contains enough to get things really started shit shit shit
But the fire extinguisher didn’t seem like the right option. Smothering it felt righter. I grabbed a tea towel and ran the tap. It only took seconds to wet it properly but seconds are long when you’ve got a fuel bottle on fire in your kitchen.
Folded wet tea towel in half and placed it over the flames.
It worked spectacularly well. Stove burner had gone to yellow at this point and it blew out easily. I grabbed the stove incorrectly tea towel and put it straight outside on the path a few meters from the kitchen door went back inside and closed the door. Everything now needed time to literally cool off inc me 🫏
Phew – drama averted – lucky
What have I learnt from this?
it will probably be a while before I light a camping stove in the kitchen 🙄
Cook too was a good choice of surface 😝
Wet tea towel works very well for smothering a small liquid fire like this was
All O rings in all my MSR pumps need replacing!!
Is there anything you’ve learnt from my mini misadventure or thing I should learn 🤠
Threaded gas canisters for camping stoves come in three different sizes, 100, 230 and 450, this is the weight of gas they contain. In the table above I’ve provided a series over overall canister weights to help you (and me) estimate the amount of gas left in a part used canister.
The 3 sizes of canister covered by my table
To get an indication of the percentage of gas left in your part used canister first weigh your part used canister and then either use the table or the following equation to get a percentage
(Current Canister Weight – Empty Canister Weight) divided by Weight of Gas in Full Canister
e.g. if I weighed my 230 canister and the scales said 200g
200g – 126g = 74g divided by 230 = 32% of the canister gas is left of the original volume
Different brands of gas may have slightly different weights of canisters or gas inside but it will make a negligible difference in terms of deciding what you are going to use for a trip
A useful top tip is to use a sharpie (permenant marker) to write the last weighed fill percentage on the bottom of the canister. This can make picking the appropriate filled canister from your stash very easy to do.
I hope this table is as useful for you as it is for me, enjoy!
In this video Steve (creator and man behind KARRYAK) takes me though a very detailed look at his pre production prototype. KARRYAK is a high performance carbon sea kayak that breaks down into 5 parts that can easily fit on a normal airline flight. This pioneering sea kayak includes some groundbreaking industry first design features and this video is the first detailed information available on the internet.
KARRYAK is a high performance carbon sea kayak that breaks down into 5 parts that can easily fit on a normal airline flight
AirShare is the hub for recreational and commercial drone operators in New Zealand. The map in their app includes important information for drone pilots but its difficult to see easily so I’m putting both text and an image here so I can access it easily.
ATC Restrictions – Flights inside black or red lines may have additional restrictions. Air Traffic Control will advise.
Low Flying Zones – UAVs are not permitted in any Low Flying Zones which are coloured orange.
Military Operating Areas – Permission from the administering authority is required to fly in these green zones.
Aerodromes – The blue circle areas indicate a 4km radius around aerodromes
Other Authorities’ Areas – This area requires you to gain approval before you fly from the administering authority or landowner
No Fly Zones – These areas are where you are unlikely to receive approval to fly from the administering authority or landowner
Danger Areas – These areas are where an activity within is a potential danger to aircraft flying over the area
Notice to Air Missions – A NOTAM contains important information that could affect the safe operation of your flight
In this post I aim to collate useful cassette toilet options information for NZ based van builders to help then meet the fixed toilet requirement in the new 2023 Self-contained Motor Vehicles Legislation Act.
The purpose of this document is to provide guidance on the key changes implemented by the Self-contained Motor Vehicles Legislation Act 2023 (the Act) which will impact local authorities.
Key for NZ Campervan owners/builders is the new Self Contained requirement for a fixed toilet.
is permanently fixed to the vehicle with the base of the toilet rigidly mounted in position and does not require removal in order to empty human waste;
Consult the linked document for a full list of requirements.
NB There is a requirement for the cassette or tank to be vented to the outside. This requirement is currently under review
Fixed toilet options:
CTS4110 – swivel, ceramic inlay, 12v electric flush, pressure supply water Dimensions are D530mm H672mm W382mm. As only the toilet seat swivels, these dimensions do not significantly change when rotated 90 degrees.
Dometic CTS4110 swivel dimensions
Dometic Saneo CS – swivel, ceramic inlay, 12v electric flush, pressure supply water
D602mm H680mm W377mm. As per diagram below, depth is 549mm with bowl at 90 degrees (assume width increases by 50mm also)
Dometic Saneo CS swivel dimensions
Thetford C223-CS – swivel, plastic bowl, 12v electric flush, pressure supply water
H534 x W414 x D580 mm. As per diagram below, depth is 556mm with bowl at 90 degrees, width increases to 427mm
Thetford C224-CW – swivel, plastic bowl, hand pump flush, on board flush tank
Thetford C223 CS swivel dimensions
H731 x W414 x D580 mm. Same platform and swivel measurements as C223 above, but taller due to onboard flush tank.
Thetford C263 – swivel, ceramic inlay, 12v electric flush, pressure supply water H750 x W417 x D600mm. As per diagram below, depth is 541mm with bowl at 90 degrees, width increases to 464mm
Thetford C263 swivel dimensions:
Thetford C402 – Bench, plastic bowl, 12v electric flush, on board flush tank H512 x W670 x D400 mm. Bench type, comes in left and right hand models – choose the side that the cassette will be removed from.
Thetford C400 Series Cassette Toilet
CHH 3924 – non-swivel, hand pump flush, on board flush tank SCNZ have stock of the below pictured toilets coming in October. These have onboard flush water tanks and piston pump flush so do not require pressurised water supply or 12V. Price will be approx $700. Measurements are D530xW395xH480mm.
NB – A swivel option is planned to be available at some point in the future but it wont be the near future.
CHH Cassette toilet from SCNZ with onboard flush tank and piston flush: